
| HOME :: Tutorial Team Forum :: Submit :: RCTspace :: Links :: Contact |
.: Layering .: Restaurants (by ZeRoSkIlL)
.: 1st Gen. Intamin 2 .: Skycoaster .: Giant Frisbee .: Deja Vu .: Invisible Entry/Exit .: Free Roaming Dirt Bikes (by Levis) .: Parking Lot (by Levis) .: Transfer Tracks
.: Parkmaking .: Hotels .: Coasters .: Entrances
.: Footpaths (including diagonal footpaths)
(by ZeRoSkIlL) .: Custom Ride Music .: RCT2 Guide (by Jazz) .: General Questions .: Making Videos |
||||||||||||
| Small Non-animated Scenery by marinersfan59 Link to Topic You'll need Dr J's Object Editor to create objects for RCT2, which can be downloaded here. When you open up the object editor, it should look like this (without anything highlighted): 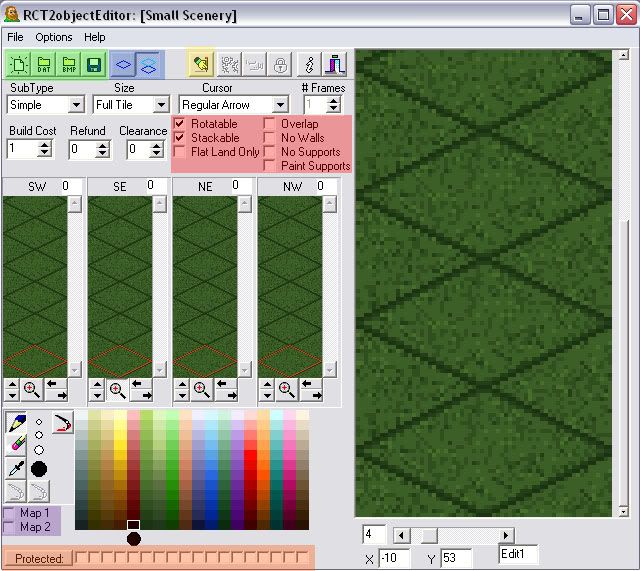 1. To start a new project, click on the 'New' button (1st one in green section), or to open an existing *.DAT object, click on the 'Open DAT' button (2nd one in green section). 2. There are two ways to make objects in the Object Creator. You can draw them from scratch (just like MSPaint) or import BMP images into each of the 4 views. If you're drawing it from scratch, then draw away and skip to step 4. If you're importing BMP's, then you'll need to have the images prepared ahead of time, usually in a 3D editing program like Anim8or. 3. To import BMP files, click on the 'Open BMP' button (3rd in green section). You will then get a prompt asking you which window to put it in. Choose according to which view you want it in. If the image is wider than 64 pixels, it will ask to resize it. Do this for each of the 4 viewports. 4. If you want something to be colorable in game you'll need to check the 'Map 1' and 'Map 2' boxes (in the purple highlighted area), and you can then paint over them with the paintbrush tool on the left side. You can also protect certain color ranges from becoming colorable or even edited by checking the box under that color's column (highlighted in orange). 5. Next we'll set the clearance of the object and position it. You can position the object by using the arrow buttons under its viewport. To set the object's height clearance, select the button on the right in the blue highlighted area. This will show squares on the top and bottom of the object. Using the clearance box below that, select the number which most accurately describes the height of your object. 6. You'll also have to make the tags for the objects. This is what is shown as the in-game name for the object that you're making. Click on the button highlighted in yellow. Type what you want the object to be called in ONE of the fields. Then go to the 'Edit' tab and click on the button next to the language that you entered the name for, and click on the button 'Copy to All Other Languages'. This will make the name of the object the same for each version of the game and you'll only have to do it once. Click on the tag button (highlighted in yellow above) again to return to the main part of the editor. 7. In the area highlighted in red, there are a few options that you can select to make your object the way you want it to act in game. Hover your mouse over the boxes to see a description of each one. Here's an example of the images used in making a test object, a teacup: Here's the 3D renderings I used to make as a test object: 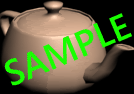 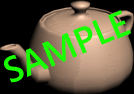   I scaled them down manually to 50 pixels wide, and got this:    
Here's how it came out in the Object Editor with all of my settings:  And finally, here's an in-game shot of my new object: 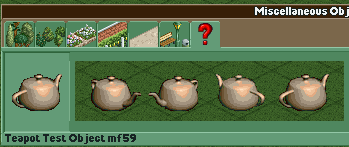
|