| HOME :: Tutorial Team Forum :: Submit :: RCTspace :: Links :: Contact |
.: Layering .: Restaurants (by ZeRoSkIlL)
.: 1st Gen. Intamin 2 .: Skycoaster .: Giant Frisbee .: Deja Vu .: Invisible Entry/Exit .: Free Roaming Dirt Bikes (by Levis) .: Parking Lot (by Levis) .: Transfer Tracks
.: Parkmaking .: Hotels .: Coasters .: Entrances
.: Footpaths (including diagonal footpaths)
(by ZeRoSkIlL) .: Custom Ride Music .: RCT2 Guide (by Jazz) .: General Questions .: Making Videos |
||||||||||||
|
Custom Ride Music in RCT2 One of the most repeated questions on several forums is how to use custom music as ride music. This tutorial will answer that question and serve as a resource for future reference. This looks like it's long, but really should only take a few minutes. For this tutorial I'll be using the song 'Give it All' by Rise against for demostrational purposes. Step 1: File Formats In order for the music to work properly, it must be formatted as a WAV file with certain specifications. If the file you'd like to improt is not a WAV, but rather an MP3, the most popular format, continue with step 1. If your file is arleady WAV, then skip to step 2. Step 1.1: Converting your file You'll need to download a converter, and the best free program can be downloaded >>HERE<<. Step 1.2: Converting your file (continued) The Program will be located at: Start>All Programs>MP3 to
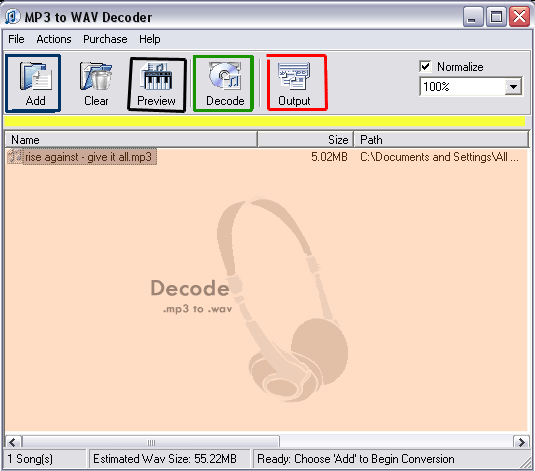
WAV Decoder>MP3 to WAV Decoder Step 1.2.1: Add the file to the list Click the "Add" button, which is outlined in blue in the image above. Now Find the MP3 file that you'd like to convert, and click open. The file should now appear in the area highlighted in orange above. The program will give an estimation for the filesize on the bottom, but it's never correct, it's usually ~60% of the estimate. Step 1.2.2: Check the file Highlight the file to be converted, and click the "Preview" button (outlined in black above) to make sure you have the right file to convert. Step 1.2.3: Select the destination Click the "Output" button (outlined in red above) to select the directory where the file will be located after the conversion. Step 1.2.4: Convert it! Click the "Decode" button (outlined in green above). The area highlighted in yellow in the image above will act as a progress bar. At the bottom on the right it should say "Busy working on 'song title'" When it says "Done," close the program, you're done with it. Step 2: File specifications The program above will not make the WAV format to the specifications needed by RCT, infact very few programs ever will. You'll need to do another quick process to fix this. Step 2.1.0: The program Every Windows computer comes with the program 'Sound Recorder'.
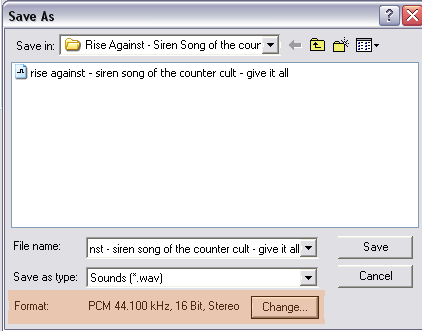
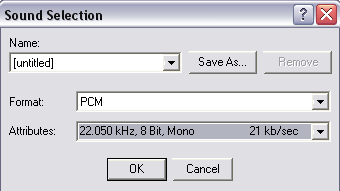
You'll need that for this step, and it's located at: Step 2.1.1: Open the file File>Open>'select your WAV file' DO NOT DO ANYTHING WITH THE FILE, NO RECORDING. Step 2.1.2: Save the file File>Save As>CUSTOM1 Step 2.1.3: Specifications Step 2.1.4: Save it The file should be saved in the RCT2 Directory in the "Data" folder (NOT OBJDATA) as CUSTOM1.WAV or CUSTOM2.WAV Step 3: In Game After you're all done with the file formatting, you'll have to
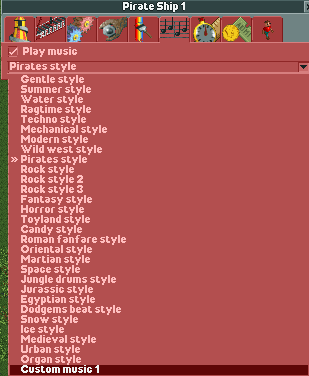
select it in the game.
|